By Angela Lucas
GOLD... This precious metal fascinated medieval society. It represented spiritual, transcendental light[1] and expressed divine intelligence.[2] The medieval love of gold is exemplified during the Byzantine period, when the establishment of the Church inspired resplendent domes, mosaics, icons, and architecture—each brushed with the light of God. Illuminated manuscripts echoed these achievements in miniature, capturing minute reflections of medieval life and devotion. Gold became an intrinsic element of the illuminated page, and borders, initials, backgrounds, and letters provided many opportunities for spiritual expression.[3]
A review of methods on applying gold leaf on illuminated manuscripts using raised gesso.
Contemporary Gilding Techniques on Manuscripts
A detailed, chronological study of manuscript gold decoration is a formidable task, far beyond the scope of this article.[4] How gold bases developed is also unclear; current written analyses of illuminated manuscripts omit specific references to gesso compositions. Sources listing possible ingredients provide academic information, rather than the practical data essential to reconstructing gold illumination.[5] Nevertheless, a brief description of contemporary illumination can provide certain insights into historical techniques.
Gold pigment, liquid gold, and shell gold[6] are the simplest methods of illumination, and represent the earliest occurrence of gold in manuscripts.[7] Gum, glair, or size provide suitable gold-grain binders. A small brush applies the mixture—technically comparable with watercolor painting. Although this method works well on rough vellum, burnished grains produce dull illumination.[8] Shell gold, acceptable for lettering or small accents, is not recommended for major work.
Patent gold consists of gold grains pressed on squares of tissue, commonly labeled "transfer gold." Oil or water mordents (usually gum ammoniac), applied on the support material, provide adhesion. Slightly more reflective than shell gold, patent gold yields a moderate quality of illumination.
Review of Medieval Techniques
Gold leaf is the most valued form of manuscript gilding, as it creates the illusion of solid gold. Technological advancements in the 12th century resulted in the development of gold leaf, a thin, delicate sheet of solid gold. This discovery captured the mirrored beauty of Byzantine gold in the codex format.
Byzantine manuscripts include many examples of raised gesso gilding.[9] Gold leaf commonly appears as a background to miniature paintings. Solid areas contain tooled patterns, creating minute reflective nuances on the surface. Raised gold letters on purple vellum contribute a spiritual majesty to the written word. Gold leaf requires a suitable base in order to exploit its properties. The gold must retain its metal sheet construction when applied, as degradation to particle form destroys brilliance. The base must be sticky to ensure adhesion, and strong to survive burnishing. The unique codex format demands malleable ingredients to endure subsequent handling.

Illuminated manuscript of Saint Luke writing at his desk. Byzantine, 12th Century, National Library, Athens
Evolution of manuscript design is a complex investigation, and historically accurate designs are not a prerequisite to the study of raised gesso gilding. Therefore, combining elements of historical interest onto a single manuscript page illustrates various techniques in a traditional setting. Mastery of gilding is essential before addressing the complexities of raised gesso in medieval manuscripts.
The practical technique of raised gesso gilding survives within the calligraphic arts. This discipline incorporates gold, lettering, and illusion, echoing elements found within illuminated manuscripts. Although the primary component of calligraphy is lettering, gold remains a valued decorative embellishment with text and illustration. Potential gilders are encouraged to investigate contemporary calligraphy books discussing ingredients and techniques.[10]
Recipes for Manuscript Gesso
The methods and techniques described reflect my own research and experiments. My artistic discipline is calligraphy; thus, Cennino d'Andrea Cennini's Il Libro dellArte,[11] and Edward Johnstons Writing & Illuminating & Lettering,[12] inspired my initial gesso experiments. Cennini's 15th century treatise lists the basic gesso ingredients: gesso sottile, white lead, sugar candy, and clear water.[13]
Gesso sottile supplies the bulk of the gesso, contributing a hard, smooth surface for burnishing. White lead provides the malleability required in manuscript work. Sugar (ground rock sugar) retains moisture ensuring the adhesion of gold leaf. The quantities he suggests are vague—listing a base gesso sottile measurement with the remaining ingredients divided into proportional thirds. Johnston[14] presents a practical, detailed formula. Although he does not specifically attribute his ingredients to Cennini, he refers to Cenninis recipe, adding a binding agent of fish glue, and further recommends slaked plaster (gesso sottile) as described by Cennini.[15]
The proportions are ten parts slaked plaster, three parts white lead, three parts fish glue, and one part treacle (sugar).[16]
WARNING: WHITE LEAD IS A CUMULATIVE POISON AND SHOULD NEVER BE HANDLED WITHOUT APPROPRIATE APPARATUS RATED FOR TOXIC SUBSTANCES.[17]
Ingredients are ground into a paste using a mortar and pestle, or a piece of sandblasted glass and a glass muller. (I prefer the latter, since the greater working area provides a finely ground mixture.) Grind the sugar and glue first, slowly add the dry ingredients. Distilled water will facilitate smooth grinding. Two or three hours of grinding is not unusual; attention must be given to the thorough mixing of ingredients. Form the wet gesso into little cakes or "buttons," and allowing to dry in a dust-free area. Dried gesso buttons will keep indefinitely.
Factors Determining Success or Failure of Gesso
Several factors determine the success or failure of gesso; insufficient grinding, contaminated ingredients, or inaccurately measured proportions. Faults become apparent when applying the gold leaf. A "dry" gesso will resist the attachment of gold or crack under burnishing. A "moist" gesso will eventually dull a brilliant gold burnish. If gilding failures persist after correcting obvious faults, the proportional value of the ingredients are investigated.
I consider humidity a significant factor, critical in determining successful ingredient proportions. Sugar is a hygroscopic substance, thus the amount included in the gesso affects subsequent gold application. An increase or decrease in the sugar measurement often requires adjusting the remaining ingredients. Experiments with a basic mixture during various local climatic conditions will reveal successful gesso proportions. In Saskatchewan, the average humidity is 67%, with highs reaching 90% (winter) and lows falling to 20% (summer). Johnstons basic recipe provides a satisfactory gilding gesso during the fall and winter. The low summer humidity required an adjustment to the basic proportions, increasing the sugar and decreasing the dry ingredients. Therefore, my spring and summer gesso recipe is eight parts plaster, three parts white lead, two parts sugar and one part fish glue. Regions experiencing less seasonal extremes need only perform small adjustments to the sugar. I do not advise increasing or decreasing the dry ingredients. A basic recipe, adjusted and tested through seasonal conditions of one year, will yield a gesso sensitive to individual environments. During the testing period, accurate recording of proportions and results assists in the recreation of successful gesso mixtures.
Several contemporary sources suggest acrylic bases as a substitute for traditional gesso.[18] However, my test samples have proved unsatisfactory, and the question of the long-term effects of an acrylic seal on vellum- and paper-support surfaces has not been answered.
Technique and Order of Execution of Illuminated Manuscripts
A specific order of execution exists when incorporating raised gesso gilding with other media and techniques. First, execute calligraphy or lettering; second, complete gilding; and last, painting. The order results from the degree of difficulty encountered when correcting various faults. Calligraphic errors present the most difficult corrections. Ink penetrates the vellum surface, and corrections will be conspicuous.[19] Painted areas attract gesso and gold fragments, requiring tedious removal or repainting.
Design simple, natural shapes for gilding. Gesso application inside geometric shapes demands certain skills and techniques developed with experience. Elongated shapes are receptive to the liquid gesso flow, encouraging quick application.
Gilding in Manuscripts
Gilding proceeds in the following order: reconstitute and apply gesso, apply gold leaf, and burnish. Glair is the gesso reconstitution liquid described by Cennini.[20] Distilled water is acceptable, although the adhesive property of glair will provide a superior gesso mixture during periods of low humidity.
Crumble a gesso button inside a narrow container with a round base, adding one or two drops of the reconstitution liquid. The gesso will absorb the liquid in one or two hours. Gesso is ready to apply when the consistency resembles thick cream. If the base appears too thin, evaporate the excess liquid. A thick gesso requires additional liquid. Stir the gesso between applications to ensure the heavier elements remain suspended in the mixture. Air bubbles are created if the gesso is stirred too quickly. Bubbles will burst as the gesso dries, forming tiny craters on the surface. Irregular areas will resist burnishing and interfere with gold application.
Apply gesso on vellum using a round, pointed brush. Drop the gesso into the center of a leaf, pulling towards the edges. The surface shape should retain a slightly curved top sloping gently down each side. Gesso height depends upon the purpose of the work; codex pages requires a low surface; two-dimensional works will accept a high surface.
Gesso dries in approximately 24 hours. Inspect the surface for irregularities with a magnifying glass. Uneven surfaces are carefully scraped until smooth. Gilding may begin immediately. I have found gesso receptive to gold leaf four or five days after the initial application. Do not postpone gilding indefinitely, as gold application becomes increasingly difficult after several days.
Gilding Tools and Techniques
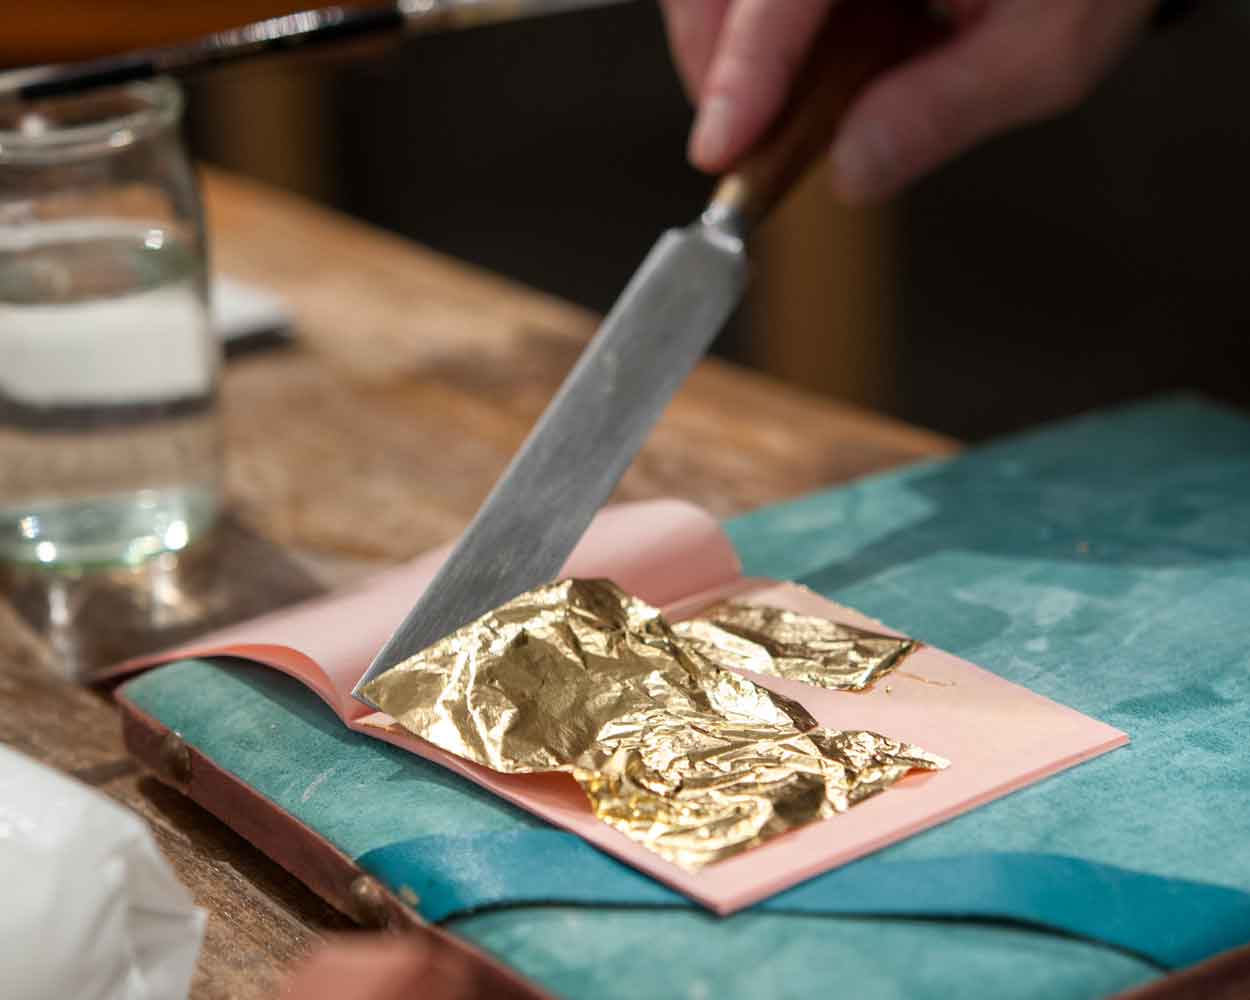
Gilding requires special equipment and materials: gilding cushion, gilding knife, paper straws, gilding brush or a small round brush, glassine paper, burnishers and silk.
The gilding cushion is simply a wooden base padded and covered with suede. Place squares of gold on the cushion and cut into small sections with a gilding knife. Construct paper straws to breathe on the gesso, moistening the surface. Gilding brushes carry gold from the cushion to the gesso surface. Glassine paper covers the gold while burnishing, and silk cleans the burnishers. Cennini[21] recommends several burnishing stones: hematite, precious stones, and animal teeth from dogs, lions, wolves, and cats. (I cannot personally confirm the value of lion, dog, wolf, or cat teeth burnishers, as I do not possess one of these historical artifacts). Assuming general supplies of wolf-tooth burnishers are nonexistent, I recommend the more readily available agate and hematite stones. Agate burnishers work well on patent and shell gold. Hematite burnishers will provide a superior mirrored polish on raised gesso gilding.
Place the equipment within reach, as speed in execution is essential. The application begins by breathing gently onto the gesso surface through a paper straw until the surface appears moist. Quickly lay the gold leaf, pressing the surface with glassine paper. Immediately begin burnishing. The gold should adhere to the gesso surface. Remove the glassine paper and burnish directly on the gold. On an exceptionally agreeable day, the gold will remain on the gesso and begin to show a bright, mirrored surface. Apply a second layer of gold and burnish as the first. If the gold detaches during burnishing, repeat the procedure on exposed gesso areas. Several attempts may be necessary before gold application is successful.
Clean and trim the gilded areas by scraping or brushing away excess gold with a scratch nib or sharp pointed knife. Outline gilded areas with a fine line of black or brown ink. Painting completes the work.
I frame my work according to museum conservation standards, using an acid-free matt, backboard and hinges. Spacers placed between the work and glass protects the gilding. The greatest enemies of raised gold leaf and vellum are static electricity, heat and humidity. Display framed works in a cool, dry area, as exposure to heat and moisture will cockle vellum and dull burnished gold.
Notes about Vellum
Vellum and parchment are natural support materials manufactured from calf, sheep, or goat skins[22] Historical emergence of skins as writing supports appear in early civilizations. Papyrus remained the premier writing surface, as crude tanning techniques relegated skins to minor works.[23] Eventually, improved manufacturing skills offered a superior writing material.[24] Pure white, flexible, and strong, vellum exhibited an affinity for ink, paint and gesso. The functional value of vellum achieved recognition during the development of the codex format. Supple skins allowed the necessary folding and stitching of folios,[25] creating a superior construction. Vellum, used almost exclusively for written works, eventually surpassed and replaced papyrus.[26] Today, this prized material has virtually disappeared. Severely limited manufacture and prohibitive costs affect quantity and quality. Yet the particular beauty of vellum remains unchallenged for traditional and modern manuscript work.
A vellum skin contains two distinct surfaces: the hair side and the flesh side. The hair side refers to the outer surface of the skin, and presents the most beautiful working surface. The flesh side, although workable, is uneven and greasy. Selection of a skin is dependent on the nature and purpose of the work. Two-dimensional works require selecting only one appropriate surface of a single skin. Codex work requires the hair and flesh sides of several skins. The limited supply of vellum becomes apparent when searching for matching surfaces. Compromises are necessary in order to balance codex requirements with vellum availability.
Preparation for the acceptance of gilding, painting, and calligraphy involves coaxing the surface to a soft, velvet-like finish. Skins arrive from the manufacturer with a hard, shiny surface attributed to modern production methods[27] Three treatments satisfy normal requirements. First, sand[28] the skin by hand to raise a nap or tooth on the surface. The skin should lie on a flat, smooth support, preferably a double- or triple-ply acid-free board. Wood surfaces displaying a distinct grain will imprint this pattern on the vellum. Sanding begins at the center of the skin, working with the grain. The grain will vary at the spine and body areas, and careful examination of the surface is necessary to locate each direction.
The second treatment addresses the natural greasiness of skins caused by incomplete protein removal at the manufacturing level. A light dusting of finely ground pounce will remove excess surface grease and inhibit the migration of inner oils.
The last treatment prepares skin areas reserved for calligraphy. Ground gum sandarac will expedite ink application and assist in the execution of crisp lettering. Excessive pounce and gum sandarac applications will interfere with the acceptance of ink, paint, or gesso.
The optimum level of preparation depends on the condition, thickness, and purpose of the skin. A skin selected for painting and gilding might not require the same tooth as a skin used exclusively for calligraphy. Experience will determine the required surface for each medium.
Notes and References
1. Otto Pacht, Book illumination in the Middle Ages, trans. Harvey Miller (New York, Oxford University Press, 1986), p. 141.
2. J. E. Cirlot, A Dictionary of Symbols, trans. Jack Sage, 2nd ed. (New York, Philosophical Library, 1971), p. 119.
3. Pacht, p. 141.
4. In fact, Otto Pacht writes that "the history of the color gold... forms an important chapter which has yet to be written" (p. 140).
5. My research to date has not revealed any academic analyses specific to Byzantine gesso base compositions used in illuminated manuscripts. I would welcome any information regarding articles, etc. on this subject.
6. Irene Base, "Gilding," in The Calligraphers Handbook, ed. C. M. Lamb, 2nd ed. (New York, Pentalic, 1976), p. 96.
7. Giulia Bologna, Illuminated Manuscripts: The Book Before Gutenberg (New York, Weidenfeld & Nicolson, 1988), p. 33.
8. Daniel V. Thompson, Jr., The Materials and Techniques of Medieval Painting (New York, Dover, 1956), p. 197.
9. See bibliography.
10. See bibliography.
11. Translated into English by D. V. Thompson, Jr., as The Craftsman's Handbook (New York, Dover, 1963).
12. Edward Johnston, Writing & Illuminating & Lettering, reprint (London, Adam & Charles Black, 1983). Johnston (1872-1944) rediscovered the lost methods and techniques of calligraphy by independent study of manuscripts at the British Museum. His contributions and teachings provide the foundation of modern calligraphy. See Priscilla Johnston's Edward Johnston, 2nd ed. (New York, Pentalic, 1976).
13. Johnston, Writing, p. 100.
14. Johnston, Writing, p. 131.
15. Slaked plaster is a refined plaster of Paris. An amount of plaster is placed inside a plastic or porcelain container, covered with water, and stirred approximately one hour. One day a week—and every other day for a month—pour off the clear water without disturbing the plaster, add clean water, and stir again. At the end of four weeks, drain the water and place a handful of plaster into several pieces of cheesecloth. Allow to dry. Grind into a fine powder before adding to the gesso mixture. See C. M. Lamb's The Calligraphers Handbook (New York, Pentalic, 1976), p. 100; and Johnston, Writing, p. 132.
16. Johnston, Writing, p. 113. Measure by capacity; an 1/8th teaspoon measuring spoon will produce a six-month supply for my work.
17. A professional toxicologist or government health agency can provide information regarding the proper handling of poisonous dry pigments. A suitable substitute is titanium white dry pigment in an amount slightly less than the stated proportion of white lead.
18. Joyce Grafe, Secreta: Three Methods of Laying Gold Leaf (New York, Taplinger, 1986), pp. 59-67.
19. I discard any works with lettering errors and begin again. A detailed design at the layout stage and attention while executing the calligraphy results in few, if any errors. Discarded works on vellum are used in the production of parchment size.
20. Thompson, The Craftsman's Handbook, p. 100. An egg white is placed inside a bowl and beaten until stiff. A small amount of distilled water is added, and the mixture is allowed to set for 24 hours. The resulting liquid is used to reconstitute the gesso buttons.
21. Thompson, The Craftsman's Handbook, p. 82.
22. Until recently, the terms vellum and parchment were used interchangeably to indicate any type of support material made from skins. The accepted designations today reserve the term vellum for calfskin, and parchment for other types of skins. See Sam Somerville's "Parchment and Vellum," in The Calligraphers Handbook, p. 61.
23. Bologna, p. 33.
24. Ibid., p. 18.
25. Folio is defined as a single sheet folded in the center. Two folios stitched together make a quatro, and four folios an octavo. See Syndney M. Cockerell's, "In the Binding of Manuscripts," The Calligraphers Handbook, pp. 199-200.
26. Bologna, p. 31.
27. For further discussion on the methods of vellum manufacture, see Somerville "Parchment," pp. 69-71.
28. A medium-rough grade of sandpaper is sufficient.
Bibliography
Cennino d'Andrea Cennini, The Craftsman's Handbook [Il Libro dellArte], trans. D. V. Thompson, Jr., New York, Dover, 1963.
Cirlot, J. E., A Dictionary of Symbols, trans. Jack Sage, 2nd ed., New York, Philosophical Library, 1971.
Child, Heather, ed., The Calligraphers Handbook, London, A & C Black, 1988.
Grafe, Joyce, Secreta: Three Methods of Laying Gold Leaf, New York, Taplinger, 1986.
Johnston, Edward, Writing & Illuminating & Lettering, reprint, London, Adam & Charles Black, 1983.
Johnston, Priscilla, Edward Johnston, 2nd ed., New York, Pentalic 1976.
Lamb, C. M., The Calligraphers Handbook, New York, Pentalic, 1976.
Pacht, Otto, Book Illumination in the Middle Ages, trans. Harvey Miller, New York, Oxford University Press, 1986.
Thompson, Daniel V., Jr., The Materials and Techniques of Medieval Painting, New York, Dover, 1956.
Reproduced with permission from the Sacred Art Journal, Volume 13 Number 3 September 1992, pages 113–19.